
KLX300 Vapor install on 2010 KLX250S

#12
 11-23-2010, 12:18 AM

Yeah, you may be right. I just found this post by WestOzKLX (https://www.kawasakiforums.com/forum...3&postcount=29) saying
Given those temps I should be worried, but what isn't clear to me is where the fan temp sensor is placed for turning the fan on/off. Looking at my bike it seems the switch is at the bottom of the radiator before the water heads down to the pump - therefore it's on the cold side. So maybe the temps aren't a problem then as you would expect them to be highest as they come out of the cylinder... right?
Anyone that has a Vapor that put the sensor where I did (TNC?) that can confirm whether I should be worried or not?
Anyone that has a Vapor that put the sensor where I did (TNC?) that can confirm whether I should be worried or not?
#13
11-23-2010, 12:21 AM
Actra, I don't think that temp is close to being right either by the guage or hopefully not the real temp going on in the engine. Mine usually runs about 160-180F on straight pavement...closer to 160 in cool weather and closer to 180 in summer. Now, when I go off road and in tighter singletrack, it will run from 175 to 195 as a norm. On two occasions in sand washes for several miles, it got to 205. It also got to 205 right before I got to the crest of Imogene pass trail in Colorado at over 13100 feet. These are the only times it's gone that high. If that's a real temp reading you're getting, I'd be concerned.
#14
11-26-2010, 10:39 PM
So based on your feedback it was clear my cooling system had a problem, and I am sure it was my poor skills when connecting up the temp sensor. I took it off, and put it in a cup of freshly boiled water to see if the sensor was potentially faulty. It read just over 90C (194F) and I am pretty much sea lever so the boiling point of water is 100C (212F). So if anything the sensor is under-reading rather than over-reading. So the problem was clearly not the sensor.
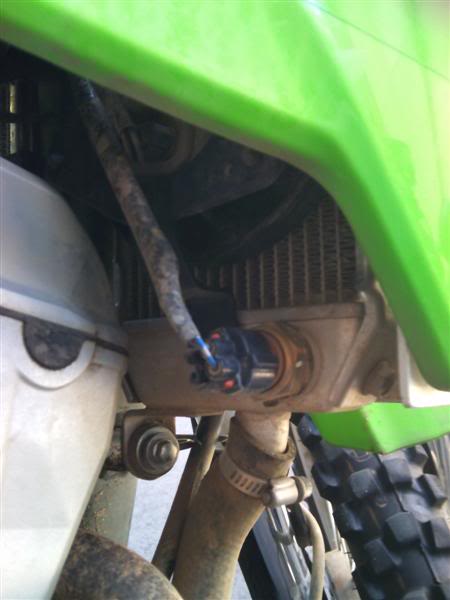
This is how my first attempt at the sensor install looked like:
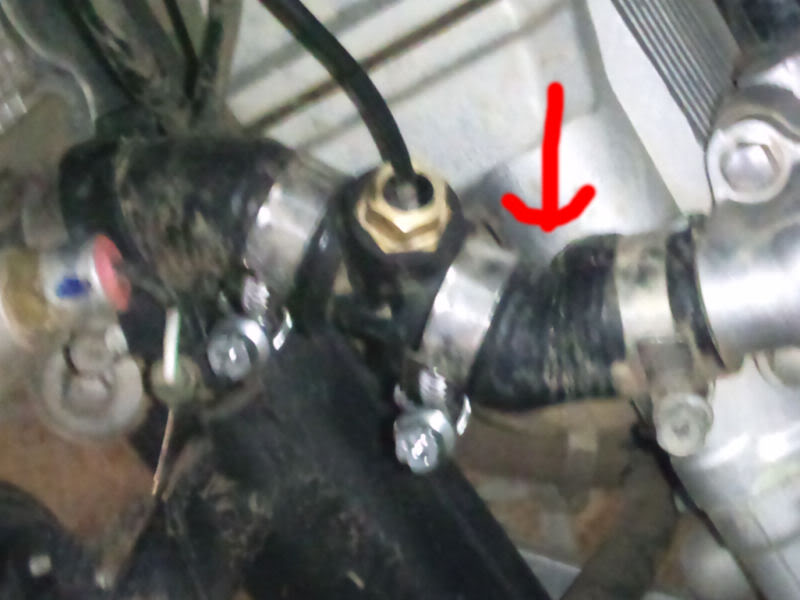
As you can see where the red arrow is, I had kinked the hose a bit. I think this was because I had not cut enough hose out before installing the sensor. I cut another 4mm off the radiator side of the hose, re-installed the sensor and tried to minimise hose king when re-tightening the hose clamps. As you can see below, it's still not perfect, but seems a lot better. On my test ride with ambients around 23C (73F) my temps seemed to stabilise around the 75C (167F) mark. Didn't go above 81C (178F). So I think I have sorted the problem out now.
I guess we will see tomorrow when I go for a proper ride (if the weather holds out)
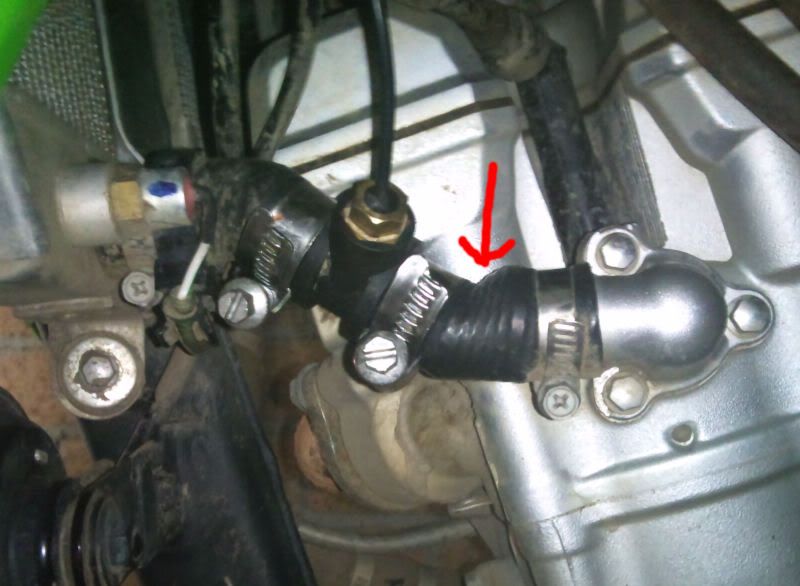
This is how my first attempt at the sensor install looked like:
As you can see where the red arrow is, I had kinked the hose a bit. I think this was because I had not cut enough hose out before installing the sensor. I cut another 4mm off the radiator side of the hose, re-installed the sensor and tried to minimise hose king when re-tightening the hose clamps. As you can see below, it's still not perfect, but seems a lot better. On my test ride with ambients around 23C (73F) my temps seemed to stabilise around the 75C (167F) mark. Didn't go above 81C (178F). So I think I have sorted the problem out now.
I guess we will see tomorrow when I go for a proper ride (if the weather holds out)
#15
01-24-2011, 05:18 AM

Join Date: Aug 2008
Location: Vancouver Island, British Columbia
Posts: 1,389
So how did things work out for you? I am installing my vapor at the moment, Just getting to the speed sensor. I tried to figure out if I could use the OEM sensor for about two hours and came up with nothing. I installed the magnet where you did but I drilled and tapped the hub and screwed the magnet/bolt in. I am messing around with teh sensor placement now. I managed to get all the lights that were on the OEM speedo to work with the Vapor dash.
#16
01-24-2011, 05:33 AM
It's working really well. I still haven't changed the wiring so the unit is powered directly through the battery rather than via the ignition, but the little battery in the unit is holding up well for now. When it dies I will probably sort the wiring out then.
Speedo-wise, it's not bad. Fairly accurate once I got the wheel diameter sorted out. What I don't like is that when you go slower the speedo has a lag on readouts while it waits for the magnet to come around again. I am thinking of getting another magnet to stick the opposite side and then half the wheel diameter to get a less laggy but still accurate readout.
The temp sensor is great. I use it a lot. With my high temps I decided to flush the old fluid out and replace it with fresh stuff which has made a huge difference. Now I sit in the 70C to 80C range in town riding rather than the 90's I struggled with before.
So all in all I rate this unit very highly. Definitely worth investing in. The only thing I would like is a cumulative trip meter to help keep track of how long I've ridden since the last service.
#17
01-24-2011, 05:03 PM
I pulled a direct connection from the battery up front with the direct-wire no-fuse method recommended by Trail Tech for powering the Vapor. Works just fine so far and now I have some power up front that could be used for something else (grip warmers, 12-V power outlet, on fuses of course).
JB weld and a magnet for speedo. I like RP's drill and tap, and the two-magnet ideas.
I'm running a tire size on the vapor of 9999 right now which is a speed and mileage multiplier of about 4.5x actual. I'll do this until it hits about 4,000 miles at which time it should indicate close to actual mileage (a little algebra required), at which time I'll drop the tire size to the 2200+/- that it should be. I tried racking up mileage on the Vapor with my old trusty electric hand-drill and burned up the bearing in it . If actual speed indicated is important for any given ride, changing the setting is very easy.
I have the temp sensor in the Thermo-Bob bypass. Love it!
Something may be funny with my wiring, though. On the vapor dash, the turn-signal indicator works only on a left turn, but not on right. I had to replace a left-rear lamp and that side blinks too fast which could be the problem. I also put a simple SPST switch in the head light ground circuit so I could turn off the headlight. When its off, the high-beam lamp on the dash comes on, which is actually a good thing.
Used the stock tachometer wires (2 of 3) to connect to the Vapor tach wire.
JB weld and a magnet for speedo. I like RP's drill and tap, and the two-magnet ideas.
I'm running a tire size on the vapor of 9999 right now which is a speed and mileage multiplier of about 4.5x actual. I'll do this until it hits about 4,000 miles at which time it should indicate close to actual mileage (a little algebra required), at which time I'll drop the tire size to the 2200+/- that it should be. I tried racking up mileage on the Vapor with my old trusty electric hand-drill and burned up the bearing in it
. If actual speed indicated is important for any given ride, changing the setting is very easy. I have the temp sensor in the Thermo-Bob bypass. Love it!
Something may be funny with my wiring, though. On the vapor dash, the turn-signal indicator works only on a left turn, but not on right. I had to replace a left-rear lamp and that side blinks too fast which could be the problem. I also put a simple SPST switch in the head light ground circuit so I could turn off the headlight. When its off, the high-beam lamp on the dash comes on, which is actually a good thing.
Used the stock tachometer wires (2 of 3) to connect to the Vapor tach wire.
#18
12-13-2012, 02:29 PM
Bump for Highbeam and others looking at the Vapor.
Note comments on unfused power to the Vapor unit. TNC reported recently TrailTech now recommends a minimum 0.5 A fused power supply from the battery.
My notes on my '06 install indicated using the Brown and Brown/Yellow tachometer wires to connect to the Vapor, and capping off the black wire. Can anyone confirm this?
Also, I used the 75-300 Vapor model. Not the 75-200.
Last edited by IDRIDR; 12-13-2012 at 02:33 PM.
#19
12-13-2012, 05:31 PM
Join Date: Mar 2010
Location: South Puget Sound, WA
Posts: 740
Okay so I searched for "chocolate block" and got so many hits that I need to ask. What is this chocolate block connector system that you used to get from the cluster plug to the vapor?
I like reversible mods so cutting and soldering is not ideal.
I like reversible mods so cutting and soldering is not ideal.
#20
01-01-2013, 05:06 AM
