
Another MotoPro fork valving question
#31
 02-06-2011, 09:27 PM

We got the bike back together except for the gas tank and plastic. I took it off the stand and got on it. She's different. That's for sure. 
#32
03-12-2011, 04:10 AM

Join Date: Aug 2008
Location: Vancouver Island, British Columbia
Posts: 1,389
Ok, so even after the fine tutelage of master TNC indicating the wisdom of going with the gold valve kit from Race Tech, I ended up going with Moto Pro because I liked it when John said his wife would run down to the post office and mail the valves to me that after noon, and when I called Race tech I got an auto attendant...nuff said. Plus John is in Washington which is close enough to be Canadian. 
I received the package today and started reading the instructions and quickly saw what TNC meant about the video from RT.
I read through FD's post here and went out and picked up a bottle of Seagrams.
BUT....The posts from David R, FD, and TNC have made this perfectly clear.
The only thing I am not sure about is where FD says he laid the high speed shims right on top of the slow speed shims. Is there not something between the two? Other wise I will follow in the footstep of FD.
Thanks guys!!
#33
03-12-2011, 04:48 AM
red, they do basically just stack on each other, but as you see in the diagram I posted in this thread, make sure you stack the high and low stacks from small to big going away or above the base plate and valve body. There has to be a smaller shim starting the low speed stack, or you'll get no "breakover" or bending of the shims for them to work properly.
#35
03-12-2011, 07:41 AM
Red, I'm really glad my frustrating experience is helping you to have a less frustrating experience. Frustration sucks. Seagrams helps. Just follow the pictures.
#36
03-12-2011, 02:20 PM

Just wait till you ride it! Yesterday I stopped at NAPA. Time to leave I just drove up over the curb, across the sidewalk , down the curb...... It felt like the suspension was actually working!
David
David
#37
03-12-2011, 03:13 PM
Join Date: Aug 2008
Location: Vancouver Island, British Columbia
Posts: 1,389
Excellent. Thanks David, it is still too gross to ride here, but it is daylight savings this weekend so that means spring is right around the corner. I will try to start this job next week.
#38
03-16-2011, 05:49 AM
Join Date: Aug 2008
Location: Vancouver Island, British Columbia
Posts: 1,389
I spent last Sunday doing the compression valves on my bike and took a few pictures to add to this thread to make it easier for the next guy.
I laid out all the parts and labeled them so that people know what we are talking about.
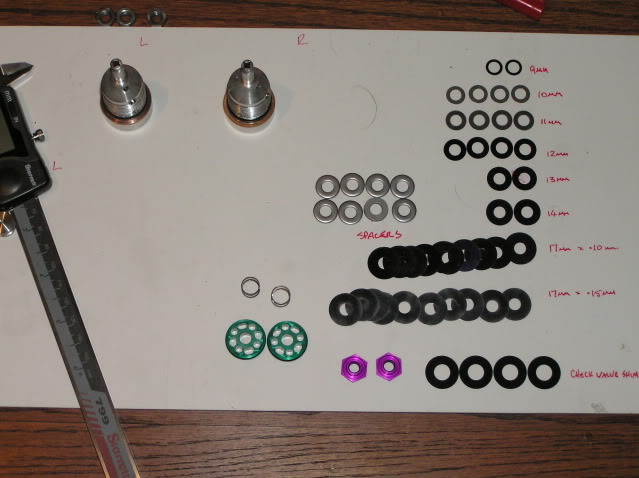
Here is a shot of the compression valve with three spacers on.

This is the valving sheet that you work from to get the stack of shims for your particular weight, riding style etc. There is a high speed and a low speed stack of shims that you load onto the compression valve in reverse order from the sheet,
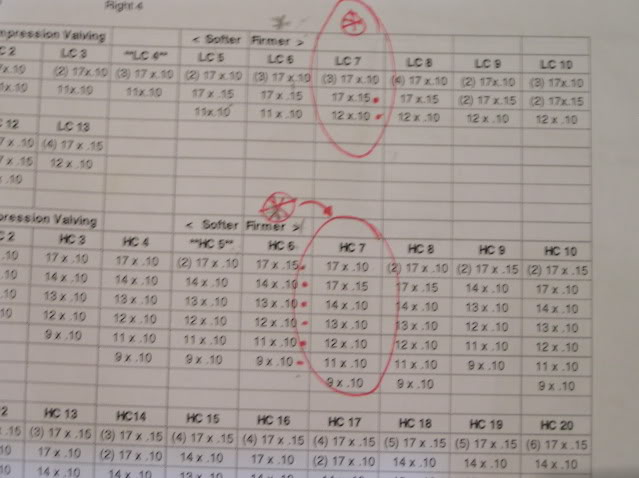
You start with the high speed stack first working from the bottom of the chart.
You work your way smallest diameter to largest through the high speed then start the slow speed stack smallest to largest right on top of that.
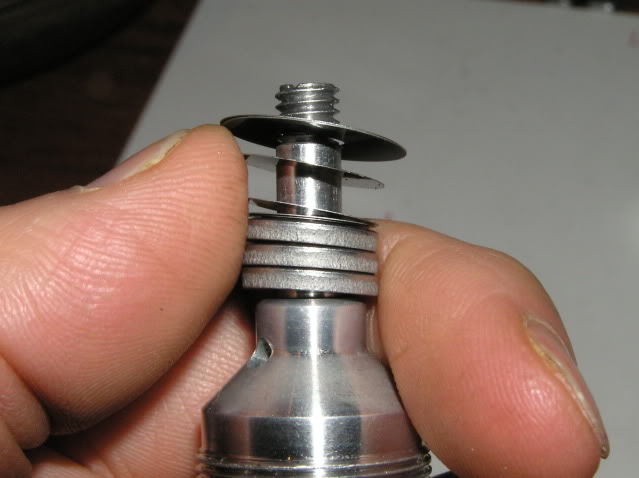
Then you slide the green valve on with the oblong holes face down onto the stack of shims.
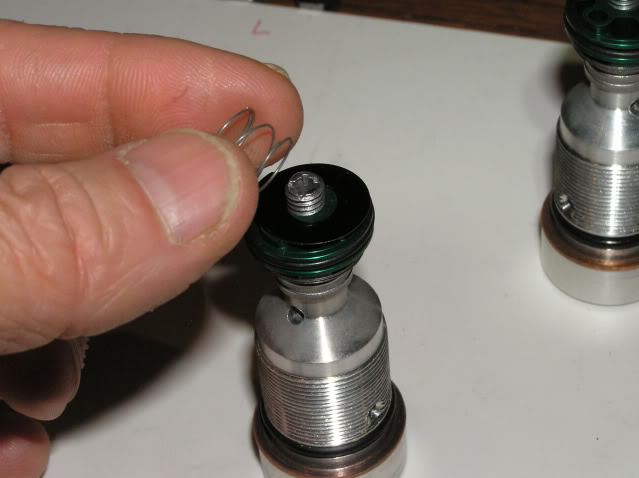
Then the check valve shims go on
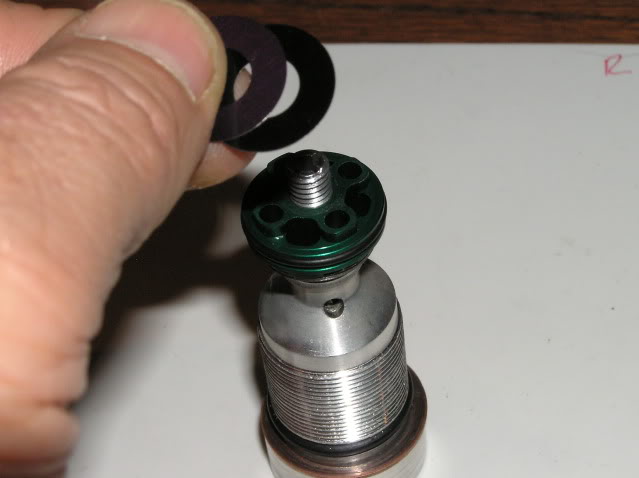
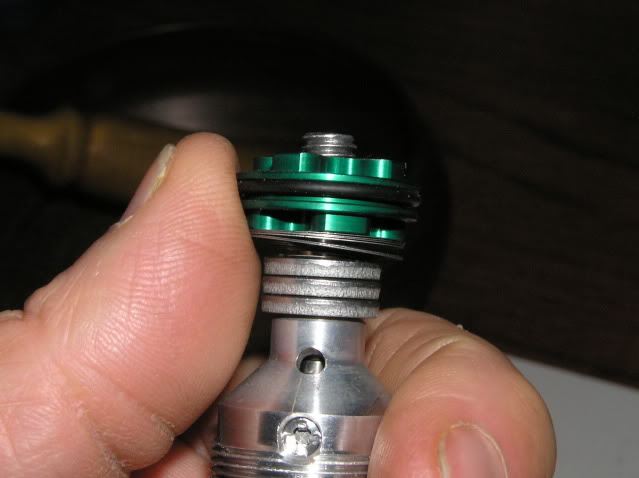
Then you put the check valve spring on and the purple cup nut on the top and tighten it up.
Hope this helps.
I laid out all the parts and labeled them so that people know what we are talking about.
Here is a shot of the compression valve with three spacers on.
This is the valving sheet that you work from to get the stack of shims for your particular weight, riding style etc. There is a high speed and a low speed stack of shims that you load onto the compression valve in reverse order from the sheet,
You start with the high speed stack first working from the bottom of the chart.
You work your way smallest diameter to largest through the high speed then start the slow speed stack smallest to largest right on top of that.
Then you slide the green valve on with the oblong holes face down onto the stack of shims.
Then the check valve shims go on
Then you put the check valve spring on and the purple cup nut on the top and tighten it up.
Hope this helps.

Thread
Thread Starter
Forum
Replies
Last Post