
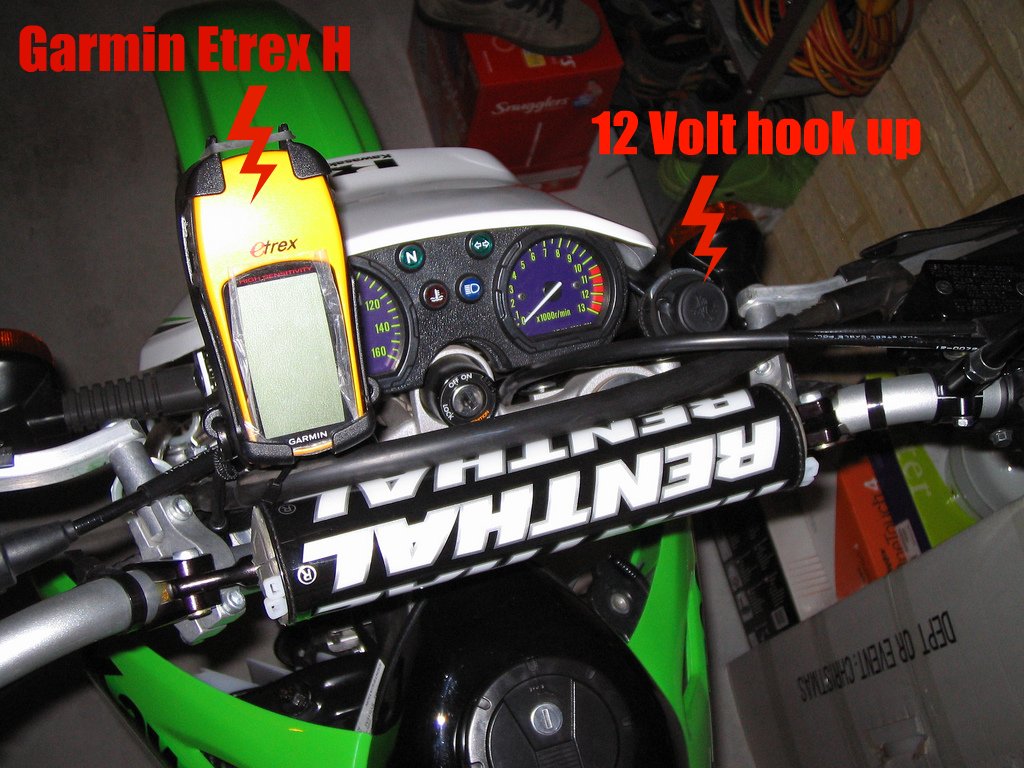
12 Volt hook up.
#31
 05-28-2009, 11:42 PM

just a quick one westozklx, i read in my workshop manual, that the over heat light should flash when the bike is neutral, does you bike do this? i have never sean my warning light on and just wondering if it works. or anyone with the older analog cluster
#33
05-29-2009, 06:56 AM

The total system could handle was 11A@13.8V, so 11x13.8= 152W..that's the entire system, with the factory items consumption added-in.
Headroom (total draw - factory draw) was somewhere in between 60 to 70W.
No sense in testing without the alternator hooked-up because we never operate that way. I think we lose a bit from what the book says due to the efficiency of the regulator.
It's also completely useless to rate product in reference to 12VDC when we are always operating at at least 13V with the engine running.
#34
05-29-2009, 10:17 AM
dam, does this mean ill have to take off my dvd player, coffee machine, headed cup holder, sound system and abs...ohhh never mind, i released that i have a klx not a BMW, sorry
#35
06-01-2009, 11:24 AM
Finished the mod a few days ago but I've only just uploaded the photos. The weather here has been great so I've been riding, surfing and hammering the MTB.
Here is the waterproof connection that comes with the Powerlet kit. I've fitted it snugly behind the headlight.

The main cable from the waterproof plug to the battery was routed next to the OE wiring loom. I think this is the neatest route for the new wires although it did mean removing the tank.

Still following the OE wiring loom the new cables were routed around the airbox (note TwinAir filter and no lid ) and secured in place with the OE wiring clips and a few extra cable ties.

Here are the new wires running into the waterproof fuse housing (part of the kit) and the live and earth cables attached to the battery. I was able to fit the new cables on top of the existing cables from the OE wiring loom as they had the same type of connection. The fuse holder (fitted with the supplied 15 amp fuse) was then secured in place by fitting it next to the battery box using an existing bolt (the bolt holding the battery box to the frame.)
The Powerlet kit is very comprehensive and I give it 5 out of 5. The only work I really had to do was to fab' up a small bracket to mount the 12V socket. This kit is designed for the socket to be fitted to a plastic panel so the absence of a bracket isn't really an issue.

Here is the waterproof connection that comes with the Powerlet kit. I've fitted it snugly behind the headlight.
The main cable from the waterproof plug to the battery was routed next to the OE wiring loom. I think this is the neatest route for the new wires although it did mean removing the tank.
Still following the OE wiring loom the new cables were routed around the airbox (note TwinAir filter and no lid
) and secured in place with the OE wiring clips and a few extra cable ties. Here are the new wires running into the waterproof fuse housing (part of the kit) and the live and earth cables attached to the battery. I was able to fit the new cables on top of the existing cables from the OE wiring loom as they had the same type of connection. The fuse holder (fitted with the supplied 15 amp fuse) was then secured in place by fitting it next to the battery box using an existing bolt (the bolt holding the battery box to the frame.)
The Powerlet kit is very comprehensive and I give it 5 out of 5. The only work I really had to do was to fab' up a small bracket to mount the 12V socket. This kit is designed for the socket to be fitted to a plastic panel so the absence of a bracket isn't really an issue.
#36
06-01-2009, 11:29 AM
Got going a little late today. Kids eh! Gotta love em though.
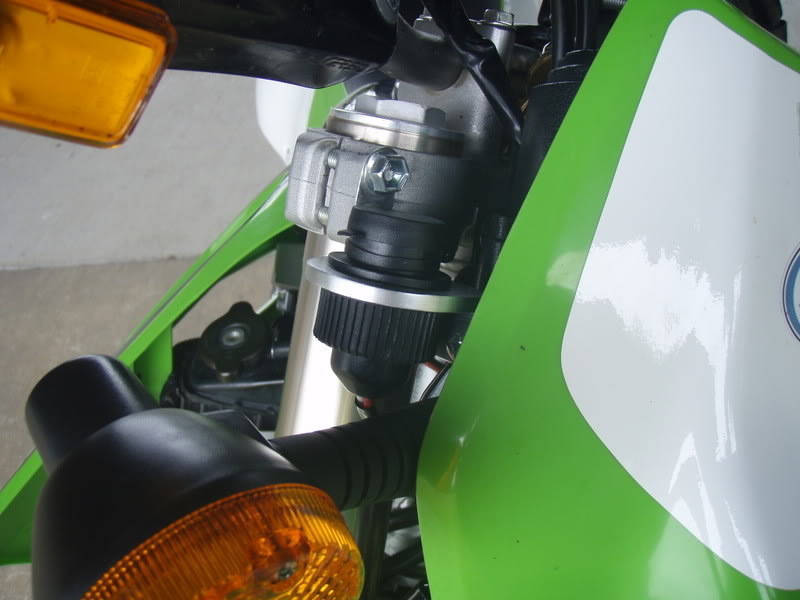
First off I acquired a small galvanized bracket designed for fencing of some description. Don't ask me, I bought it cause it was galvanized and only 80 cents. Back home I set to shaping it into a more desirable form. 20 minutes with the drill, angle grinder and a selection of small files produced the desired effect. I love tools. The more you can have out for a single job the better.
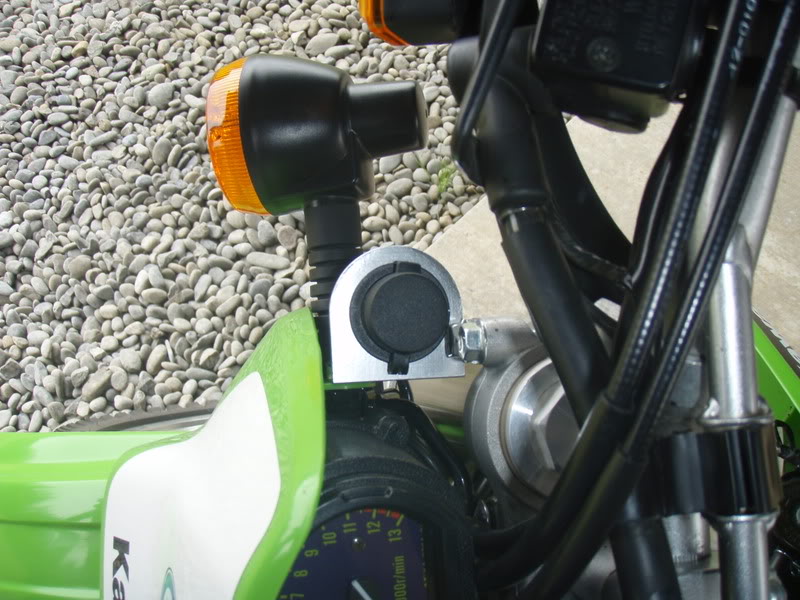
I had already decided that the best site to fit the bracket was to the upper fork clamp on the right side. It has 2 bolts to hold the bracket securely and offers some protection for the 12 volt plug.
The bracket fitted up perfectly and the top fork clamp bolts were torqued back up to the correct spec'. The plug was then fitted up without a hitch. That's half the job done. I'll do the easy bit, the wiring tomorrow.
Here a few shots of mod so far, or is it a farkle. Anyway I had some fun workin' in the garage with the sun out and the beach boys on the radio. It's all good.


First off I acquired a small galvanized bracket designed for fencing of some description. Don't ask me, I bought it cause it was galvanized and only 80 cents. Back home I set to shaping it into a more desirable form. 20 minutes with the drill, angle grinder and a selection of small files produced the desired effect. I love tools. The more you can have out for a single job the better.
I had already decided that the best site to fit the bracket was to the upper fork clamp on the right side. It has 2 bolts to hold the bracket securely and offers some protection for the 12 volt plug.
The bracket fitted up perfectly and the top fork clamp bolts were torqued back up to the correct spec'. The plug was then fitted up without a hitch. That's half the job done. I'll do the easy bit, the wiring tomorrow.
Here a few shots of mod so far, or is it a farkle. Anyway I had some fun workin' in the garage with the sun out and the beach boys on the radio. It's all good.
#37
06-03-2009, 02:41 AM

Join Date: Mar 2008
Location: IL south suburbs of chicago
Posts: 64
I've had it come on before but it came on when it got hot.
#38
06-17-2009, 07:10 PM


#40
06-18-2009, 12:50 AM
This may help!
You're after a 12 volt plug for your GPS?
http://mail.gme.net.au/garmin/access..._ref_chart.php
You're after a 12 volt plug for your GPS?
http://mail.gme.net.au/garmin/access..._ref_chart.php