
92 KZ1000 carb tear down, cleaning and inspection p1
#1
 06-21-2010 | 07:02 AM
Ok, finally got off of my duff and needed to get the KZ running. The ride was obtained from a non rider who could not get the "dang thing to run"
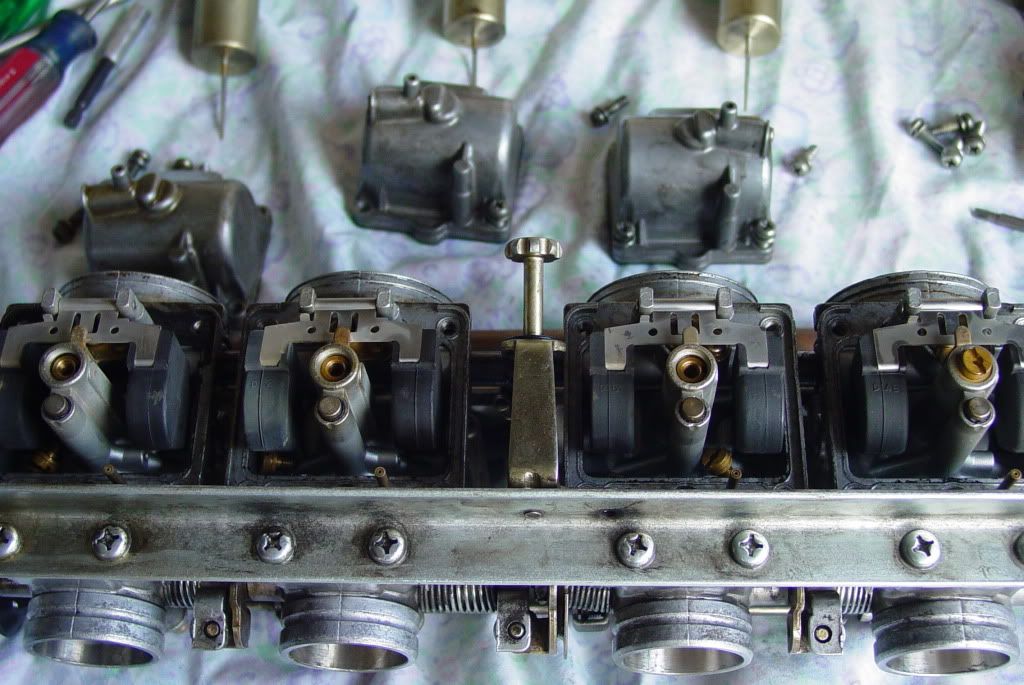
As you all know, any carb includes the same basics. This rack from the KZ is the Mikuni BS34X4.
Pulling any rack from a steel framed kawi or hunda is a real pain. Remove the battery, loosen up the airbox, loosen the clamps and slide the airbox to carb boot springs back. Loosen the throttle and return cables on the rack. (You may not be able to remove the cables until you get the rack at a semi-removed position)
Pull up and out to the right of the ride. Takes a bit more force and effort than what you would normally do on a sportbike.
Ok, most of that was from the service manual but I had to add my input to aide in what the manual lacked to mention. lol
ok, pics
Varnish pic, not horrible, but bad enough to cause issues

Tell me what is wrong in this pic? I was hearing a rattling sound as I was getting the rack off of the bike.

While the rack was off and parts were being soaked, I inspected the carb boots. Oh Oh, not much more time left for these boots. They are however not cracked all of the way through.

The pilot plug o rings were toast, so installed a new set. The pilots are still soaking. The mains were bad enough.

The needle/seat after cleaning pic. They are actually in good condition.

All of the floats were visually inspected for leaks, and and seemed to be ok.
Will post up float height and adjustments this week.
As you all know, any carb includes the same basics. This rack from the KZ is the Mikuni BS34X4.
Pulling any rack from a steel framed kawi or hunda is a real pain. Remove the battery, loosen up the airbox, loosen the clamps and slide the airbox to carb boot springs back. Loosen the throttle and return cables on the rack. (You may not be able to remove the cables until you get the rack at a semi-removed position)
Pull up and out to the right of the ride. Takes a bit more force and effort than what you would normally do on a sportbike.
Ok, most of that was from the service manual but I had to add my input to aide in what the manual lacked to mention. lol
ok, pics
Varnish pic, not horrible, but bad enough to cause issues
Tell me what is wrong in this pic? I was hearing a rattling sound as I was getting the rack off of the bike.
While the rack was off and parts were being soaked, I inspected the carb boots. Oh Oh, not much more time left for these boots. They are however not cracked all of the way through.
The pilot plug o rings were toast, so installed a new set. The pilots are still soaking. The mains were bad enough.
The needle/seat after cleaning pic. They are actually in good condition.
All of the floats were visually inspected for leaks, and and seemed to be ok.
Will post up float height and adjustments this week.
#2
06-22-2010 | 05:56 AM

Senior Member
1st Gear Member
Joined: Sep 2006
Posts: 5,024
From:
Nice pics drag.
If I may add, those eight philips head screws can be a biatch to get off to pull the carbs off the rail (at least they were for me). When I was changing the o-rings for the fuel tubes I could only get one of mine out without destroying the head and resorting to vice grips. I swaped them with a M10 hex head bolt and made life easier.
If I may add, those eight philips head screws can be a biatch to get off to pull the carbs off the rail (at least they were for me). When I was changing the o-rings for the fuel tubes I could only get one of mine out without destroying the head and resorting to vice grips. I swaped them with a M10 hex head bolt and made life easier.
#3
06-22-2010 | 11:50 AM
If I may add, those eight philips head screws can be a biatch to get off to pull the carbs off the rail (at least they were for me). When I was changing the o-rings for the fuel tubes I could only get one of mine out without destroying the head and resorting to vice grips. I swaped them with a M10 hex head bolt and made life easier.
tubes I could only get one of mine out without destroying the head and resorting to vice grips. I swaped them with a M10 hex head bolt and made life easier.
#7
07-29-2010 | 12:23 AM
Super Moderator
1st Gear Member
Joined: May 2007
Posts: 3,350
From: Clarksville, OH
Mmmmm, don't look now, but you have a jet lurking below the float on #3, and the jet in #4 still needs to come out. Looks like the #'s 1 and 2 jets are also lurking under the floats (unless you put them there to keep track of them....)
There oughtta be a law against putting little rubber pieces into (nearly) inaccessible places! If I was committed to keeping that ride, I'd look into getting O-rings made from Viton rubber (green-ish color and impervious to darn near everything.) Used alot in food grade and medical applications.
Agree, great pics. They belong in the "how to" section and should be basic education for newbs.
Last edited by jeffzx9; 07-29-2010 at 12:25 AM.
#8
07-29-2010 | 03:29 AM
Mmmmm, don't look now, but you have a jet lurking below the float on #3, and the jet in #4 still needs to come out. Looks like the #'s 1 and 2 jets are also lurking under the floats (unless you put them there to keep track of them....)

#10
08-14-2010 | 08:52 AM
ok, project is completed. The new ducts allowed me to install the rack in maybe 20 minutes over the 2hrs of fighting with the old non-pliable ones. Adjusted the throttle play and next is the testing with placing an inline filter prior to this of course.