
05-06 zx6r shogun cut install
#1
 03-26-2008, 05:12 PM


Okay for all of you out there that are alittle afraid to cut up your fairings for frame sliders this is how you would do it for a 05-06 zx6r! Now the reason why you would want a cut kit over a non-cut kit is because the cut kit offers more strength for protection in a crash or in a slide out from corners. The non-cut kits which I don't recommend will help if you are going maybe slow speeds or just dropping in the garage, but will, most of the time, cause serious damage to the engine mount and might even cause damage to the parts you wanted to protect.
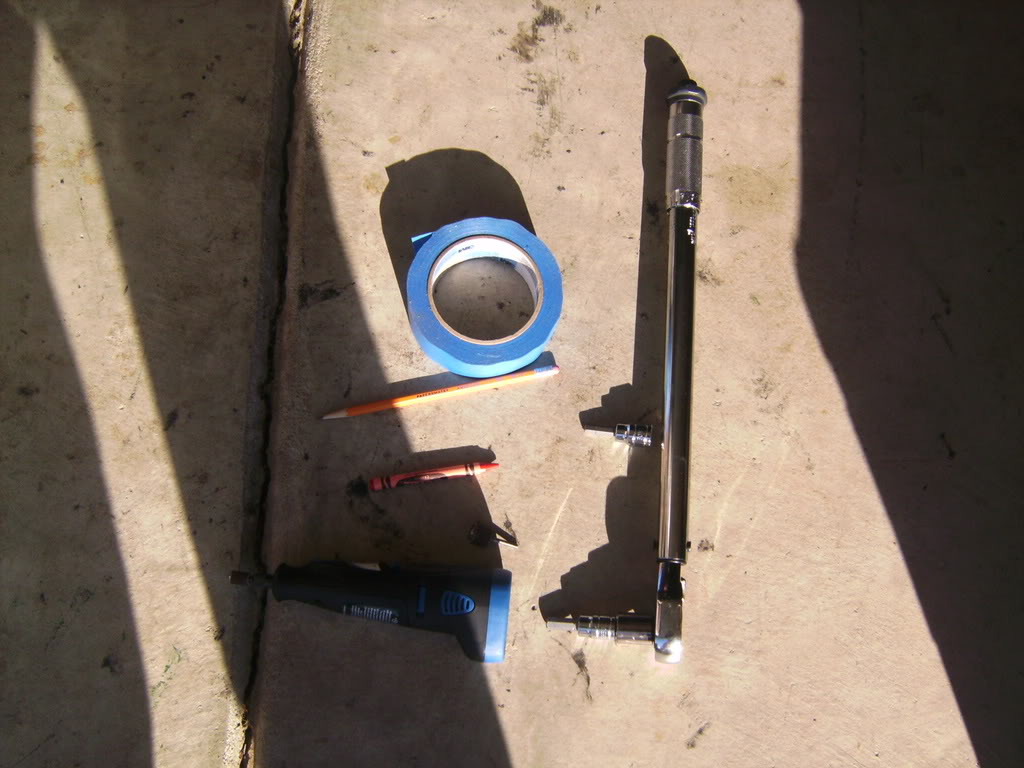
Well anyways enough with my tangent. Okay first what you are going to need is a pipe wrench or torque wrench with a long handle for a more effective and easier way to take off the engine mount nuts. You will also need a 3/8" 6mm hex socket(for taking off oem engine mount bolt), a 3/8" 8mm hex socket (for the shogun bolts), dremel equiped to sand, some masking tape ( i used blue painters tape, but any type of masking tape will do), a crayon or pencil for marking the cuts (or something perferably washable).
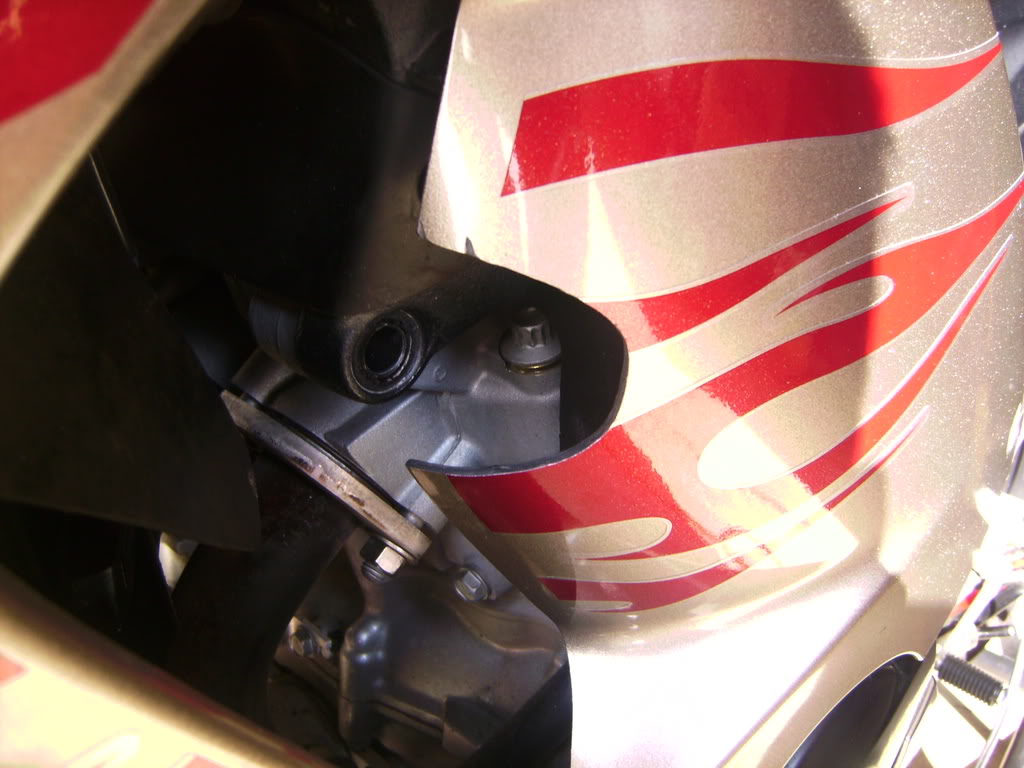
Now first we will start with the left fairing (left as in if you where siting on the bike) because it is the most difficult side and will be the most time consuming. First, remove the bottom left fairing. Next, remove the upper right fairing. Then, remove the left engine mount nut utilizing the 6mm hex socket and the long torque wrench. Now if it starts to round off the bolt, try having one of your hands and place it over the top of the wrench to add for force to keep the hex socket in place. Remove the bolt. There is a engine mount lock nut that is at the other side of the inside of the engine mount; make sure not to lose it, becuase it will fall out the bottom once you loosen the bolt to a certain point. So before the bolt fully comes out place your hand at the other side to catch the nut. When placing the bolt back in, hold the nut on the other side until the bolt's threads are on the nut and then commense to tighting.
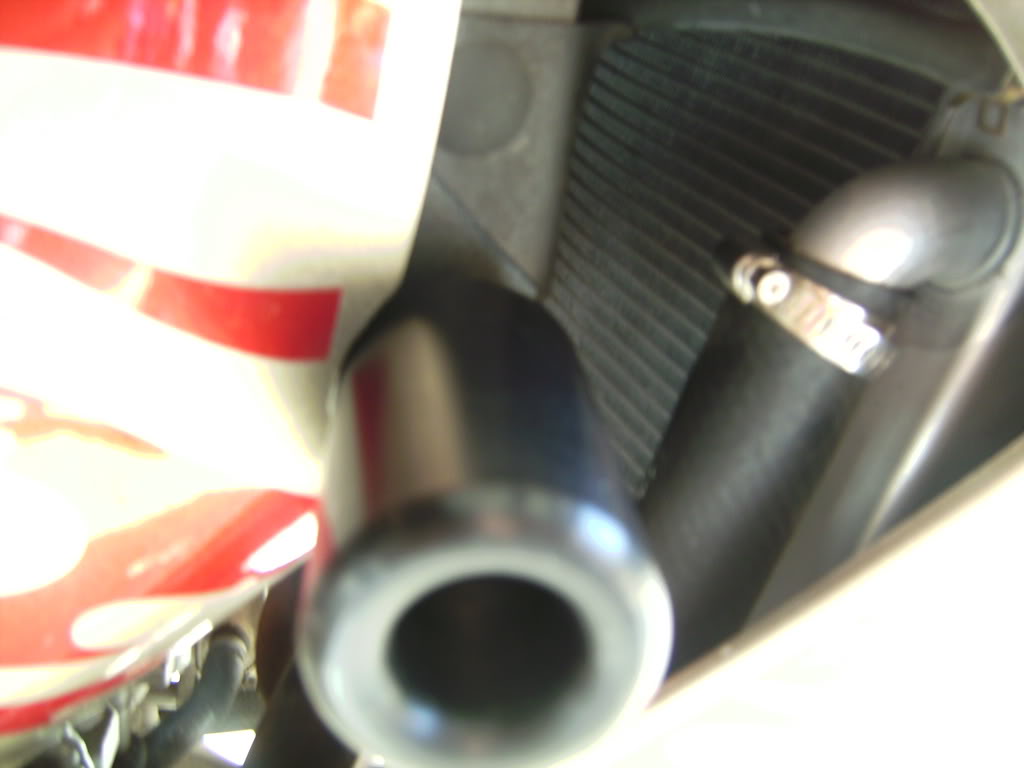
Next, take the spacer and the puck for the left side and slide the bolt through it and make sure it will fit. While the puck is there take the left uppper fairing and then try and fit it back on the bike. Now you will see that the puck will stop it, but then you take your handy dandy pencil or crayon and market horizontal lines on where the top of the puck is. Next, do the same to where the bottom of the puck is. Then take the puck off and place the fairing back on the bike. Then try and line the puck up, without the spacer, with the mount and then trace the far right side of the puck, again with a crayon or pencil. [&:]
Remove the puck from the fairing and then around the area that you marked take masking tap and tap a good portion as close to the line as possible. Overlap alittle of the tape. The reason for doing this is because when it comes time to cut the fairing using a dremel or some other type of rotory cutter, it will be a great help to use tape to guide you while cutting, also protects other parts from getting hit by the cutting.
Now comes the left side cutting. What I recommend and what I have heard from alot of other people is to use the dremel at a high rpm with the rough sandpaper cylinder piece. That way you don't have to sand it smooth later, because at a high rpm the sanding will in affect heat up the fairing causing a very smooth cut than if you use a cutter. When I did the cutting I put the fairing comfortably in my lab and comensed to cutting. Keep your strokes short and don't push to hard, if you push to hard will cause you to maybe skip off the cutting area and hit the fairing where you don't want it cut (ergo that is why the tape is there)! Okay now as a rule of thumb keep your first cut inside of the lines. After getting close to the line stop and place the fairing up on the bike again and check with trying to place the puck into the mount hole. If it doesn't fit, while keeping the puck there trace where the puck is still hitting and then sand again those areas.
Now how I thought to keep it was to make it look like a half moon shape. But more like a U on its side. Keep the tops generaly straight, keep the right side generally curved in a half circle shape. It will look as if the fairing is shapped to just fit the puck. It will also look some what better than if you did like a hex or box shape. Just a reminder that when you are first cutting don't worry about getting it right the first time. Take it slow and try to get the height of the puck cut correct. Then from there sand it further right as need. When it starts to show some roughness or pieces that are build up on the cut take the dremel at a low rpm and take it against the fairings that way to get all the strands off. Also if you think the cut is not straight or the fairing is cut to much at an angle take the sander tool on the dremel at a low rpm and straighten it out. Once your are done then clean off the fairing (including the tape). You have just finished the left side. [:-]
Now for the right side. MAKE SURE THE ENGINE MOUNT BOLT ON LEFT SIDE IS IN BEFORE YOU TAKE RIGHT ENGINE MOUNT BOLT OUT!! Again using the same tool as on the left side take off the engine mount bolt. You don't have to take fairings off this time because the bolt is showing. Now taking the other puck without the spacer, place it in the mount hole. Again there will be a nut to watch out for dropping! Now if you feel like the puck is hitting the fairing then you will have to slightly, and I mean slightly cut the right fairing. Now while the puck and bolt is on the hole, if the fairing is touching take the crayon or pencil, trace where the puck is hitting the fairings. Then remove the fairings on right side. Tape it up like the other side. Then again take dremel at a high rpm with a sander tool and sand the fairing to the line. Make sure it is even and not an angle cut. Then try and see if the puck will not touch the fairing. If it doesn't you are done! If it does then again trace then sand alittle more off.
You have just finished cutting the fairings for the shogun frame slider kit ]
]
NOTE: I don't have any pics up now but once I get my digital camera's battery charged I will make sure to take pictures and post them. Furthermore, I do not take any responsiblity for anyone that damages their fairings while doing anything stated in this how to! If anybody has any questions please PM me... i will be more than glad to help you out!
EDIT: THE ENGINE MOUNT BOLTS ARE 33 FT-LB TORQUE. That is from the engine removal chapter in the service manual!
Well anyways enough with my tangent. Okay first what you are going to need is a pipe wrench or torque wrench with a long handle for a more effective and easier way to take off the engine mount nuts. You will also need a 3/8" 6mm hex socket(for taking off oem engine mount bolt), a 3/8" 8mm hex socket (for the shogun bolts), dremel equiped to sand, some masking tape ( i used blue painters tape, but any type of masking tape will do), a crayon or pencil for marking the cuts (or something perferably washable).
Now first we will start with the left fairing (left as in if you where siting on the bike) because it is the most difficult side and will be the most time consuming. First, remove the bottom left fairing. Next, remove the upper right fairing. Then, remove the left engine mount nut utilizing the 6mm hex socket and the long torque wrench. Now if it starts to round off the bolt, try having one of your hands and place it over the top of the wrench to add for force to keep the hex socket in place. Remove the bolt. There is a engine mount lock nut that is at the other side of the inside of the engine mount; make sure not to lose it, becuase it will fall out the bottom once you loosen the bolt to a certain point. So before the bolt fully comes out place your hand at the other side to catch the nut. When placing the bolt back in, hold the nut on the other side until the bolt's threads are on the nut and then commense to tighting.
Next, take the spacer and the puck for the left side and slide the bolt through it and make sure it will fit. While the puck is there take the left uppper fairing and then try and fit it back on the bike. Now you will see that the puck will stop it, but then you take your handy dandy pencil or crayon and market horizontal lines on where the top of the puck is. Next, do the same to where the bottom of the puck is. Then take the puck off and place the fairing back on the bike. Then try and line the puck up, without the spacer, with the mount and then trace the far right side of the puck, again with a crayon or pencil. [&:]
Remove the puck from the fairing and then around the area that you marked take masking tap and tap a good portion as close to the line as possible. Overlap alittle of the tape. The reason for doing this is because when it comes time to cut the fairing using a dremel or some other type of rotory cutter, it will be a great help to use tape to guide you while cutting, also protects other parts from getting hit by the cutting.
Now comes the left side cutting. What I recommend and what I have heard from alot of other people is to use the dremel at a high rpm with the rough sandpaper cylinder piece. That way you don't have to sand it smooth later, because at a high rpm the sanding will in affect heat up the fairing causing a very smooth cut than if you use a cutter. When I did the cutting I put the fairing comfortably in my lab and comensed to cutting. Keep your strokes short and don't push to hard, if you push to hard will cause you to maybe skip off the cutting area and hit the fairing where you don't want it cut (ergo that is why the tape is there)! Okay now as a rule of thumb keep your first cut inside of the lines. After getting close to the line stop and place the fairing up on the bike again and check with trying to place the puck into the mount hole. If it doesn't fit, while keeping the puck there trace where the puck is still hitting and then sand again those areas.
Now how I thought to keep it was to make it look like a half moon shape. But more like a U on its side. Keep the tops generaly straight, keep the right side generally curved in a half circle shape. It will look as if the fairing is shapped to just fit the puck. It will also look some what better than if you did like a hex or box shape. Just a reminder that when you are first cutting don't worry about getting it right the first time. Take it slow and try to get the height of the puck cut correct. Then from there sand it further right as need. When it starts to show some roughness or pieces that are build up on the cut take the dremel at a low rpm and take it against the fairings that way to get all the strands off. Also if you think the cut is not straight or the fairing is cut to much at an angle take the sander tool on the dremel at a low rpm and straighten it out. Once your are done then clean off the fairing (including the tape). You have just finished the left side. [:-]
Now for the right side. MAKE SURE THE ENGINE MOUNT BOLT ON LEFT SIDE IS IN BEFORE YOU TAKE RIGHT ENGINE MOUNT BOLT OUT!! Again using the same tool as on the left side take off the engine mount bolt. You don't have to take fairings off this time because the bolt is showing. Now taking the other puck without the spacer, place it in the mount hole. Again there will be a nut to watch out for dropping! Now if you feel like the puck is hitting the fairing then you will have to slightly, and I mean slightly cut the right fairing. Now while the puck and bolt is on the hole, if the fairing is touching take the crayon or pencil, trace where the puck is hitting the fairings. Then remove the fairings on right side. Tape it up like the other side. Then again take dremel at a high rpm with a sander tool and sand the fairing to the line. Make sure it is even and not an angle cut. Then try and see if the puck will not touch the fairing. If it doesn't you are done! If it does then again trace then sand alittle more off.
You have just finished cutting the fairings for the shogun frame slider kit![
]NOTE: I don't have any pics up now but once I get my digital camera's battery charged I will make sure to take pictures and post them. Furthermore, I do not take any responsiblity for anyone that damages their fairings while doing anything stated in this how to! If anybody has any questions please PM me... i will be more than glad to help you out!
EDIT: THE ENGINE MOUNT BOLTS ARE 33 FT-LB TORQUE. That is from the engine removal chapter in the service manual!
#2
03-27-2008, 02:46 AM
Join Date: Jul 2006
Location: Yellowstone Country = mountains
Posts: 1,397
nice man, its looking good, just a hint, i have seen people put doorgaurds so it doesnt look so cut, ill see if i can find a pic of what im talking about, you can get the stuff at walmart for like 1.50 for 6 feet
#4
03-27-2008, 03:43 PM
cool i will check it out...but as you can see the only thing that really looks cut is the left side...because when i fit the puck in there it had to much space on top..but everywhere else fit like a charm...

Thread
Thread Starter
Forum
Replies
Last Post